Rollcage Halo
I analyze Ryan Newmans wreck and why I think the roll cage halo bar crushed. Correction: I mentioned that the halo bar in a cup car didnt have a center support next to the driver. I found a better. In this safety tech article CIRCLE TRACK begins a 10-point rollcage installation as our City Boys break out the welder and begin constructing the ultimate rollcage for their Mini Stock project car.
.JavaScript based drop down DHTML menu generated by NavStudio. UTVs:Yamaha Rhino 'Roll Cages'Side Panels, Doors & Bolt on Leg MindersYamaha Rhinos are very versatile vehicles when they come fromthe factory. To take them out into the dunes like you see them being usedprobably wasn't what the Yamaha design engineers had in mind.Here we are going tofocus on roll cages, side panel or leg minders. Will be covered in another section.The stock Rhino is very easy to get in and out of, but it is notbuilt with a rollover in mind.
The first problem is the door opening is wideopen. During a roll, your first instinct is to try and stop theroll. No matter how strong that you think you are, your leg willnot stop UTV from tipping over.Stock Yamaha RhinoThe solution is to add a barrier that will not allow you leg toget out of the vehicle. Lots of options to solve this are available from nets toaluminum leg minders, to steel tubing and full doors with aluminum.The second problem with the stock Rhino is the 'rollcage'. Yamaha doesn't even call it a roll cage for liability reasons, andeither do most of the aftermarket guys. In our sue happy society, calling it aroll cage would then somehow mean that you would be safe in a roll-overaccident.
For simplicity, we are going to call them roll cages - just try not toroll because that isn't what they were designed for. Silly, huh?The stock cage is probably just fine for the most likely intended use of cruising aroundthe farm doing odd jobs, but in the dunes, a bit more strength and cross bracingwould be nice. New cages also add a bar behind the seats where harnesses (seatrestraints) should be attached. What to look for:.Material selection - Chromoly, mild steel or aluminumand thickness. Each material & thickness has pros and cons - cost,strength, weight, etc.
Make sure you ask questions.Cage Design - Gussets and triangulation increase thestrength without adding much more weight.Removeable? - Most aftermarket cages are bolt-on.This eases the installation and also allows the customer to get their Rhinointo their toy haulers. Besides mounting to stock lower bars, does the cageadd any mounting locations? A custom made cage that is bolted or welded tothe frame is stronger than one that bolts to the factory cage location, butcost will increase and you won't be able to get the cage off as easily or atall.Restraint Mounts - Make sure the cage includes a barbehind the front seats for attaching shoulder harnesses.
Shoulder harnessesshould be attached slightly below your shoulder level. If the cage does notallow for this, find another cage.
We’ve walked through the topic of rollcages extensively in the past, from an, to, and a range of other similar guides. But what we haven’t yet spoken about is the very foundation of any rollcage project, and that’s measuring your car (or truck) for the cage before a single bar is ever cut or bent.Fact is, no two makes and models of vehicles are the same, from the floor to the roof, the width of the roof, or in the angles at the roof, the door stills, or A-pillars. Likewise, not everyone strips their car down the same way. And so, whether you’re planning to make a go of it yourself from scratch, or order a custom rollcage from a reputable manufacturer, understanding how to measure the lengths and angles on the vehicle will ensure that the cage is a perfect fit the first time., one of the leading builders of made-to-order rollbars and rollcages, fields calls daily from customers with a myriad of different vehicles, all with different wants and needs. With the right measurements, their jobs are easy. The challenge is ensuring those measurements are right, because once the bar is bent and it’s sent out the door, it is what it is.According to Chassis Engineering’s Curt Perry, “When a customer calls and they want to put a rollbar or rollcage into a stock vehicle and retain the factory interior, we generally have those dimensions in our system for a range of popular vehicles.
Where that changes is when they call with a specific vehicle, they’re going to skin the car, and they want to build a rollcage or a chassis. By that, we mean they’re taking every piece of non-essential steel out of the car, including the floor, the roof supports, and all.”. Whether you’re putting a cage in your daily driver or stripping the body down (like this Mustang) for a full-on chassis build, procuring proper measurements will ensure a nice, clean fit of the cage inside the car.What helps Chassis Engineering to fabricate the proper rollbar or cage for the car is then obtaining dimensions for the inside of the vehicle. Because, with everything, including the bulky interior trim pieces removed, the inner dimensions are going to be much different than a stock vehicle — a factory, daily-driven Mustang or Camaro, for example. The final product of a main hoop in a full chassis car at Chassis Engineering.While the stock vehicle dimensions could be used, fitment is going to suffer. Roughly, an inch or two of headroom and shoulder room would be lost in doing so. A full-on, skinned chassis build creates a wider and taller cocoon for the driver, and allows for more room should the customer choose to install a Funny Car-style cage, as well.“Our chassis kit is designed for the specific body that the customer is going to be using.
It’s not a mass-produced carbon body, but a vehicle that they’ve skinned that has a unique measurement to it,” Perry explains.Measuring For The Main Hoop. With the marks made on the headliner, determining the “A” dimension is a simple matter of measuring from side to side.To help with this, Chassis Engineering created a basic paper-cutout protractor and includes on their instruction sheets, which one can cut out and utilize to determine the angles within their vehicle. If you want to be a little more accurate, you can also purchase a more specific protractor-like tool that chassis shops use to help determine these angles. Whichever you decide to use, it will be key in determining the “A” measurements, as well as many other key angles within the body.“We came up with this to help people determine their angles without having to buy a tool. I usually advise people to glue it to a piece of cardboard or something to make it more rigid,” Perry explains. This is your aim — a nice fit to the body, but not so tight you can’t work between them to weld the chassis.Perry shares that the “A” measurement can be done a couple of different ways. One, you can use your protractor, and with it set up in the corner, about 1/2-inch from the body, determine where the bend/radius of the bar at the roofline will begin, and make a mark on the roof, or lay a piece of tape at the spot.
Then, you’ll do the same on the other side of the car, followed by measuring between them. Second, if you have a helper, you can simplify this by using a pair of protractors on each side, locate the bend location, and measure between them.As with every step in this measurement process, don’t throw out the idea of simply getting your measurements and mocking it all up with paper, cardboard, or something else to check your work skilled chassis builders do it all the time. A diagram showing how the “A” dimension is determined, using the cutouts or a more purpose-made protractor.Moving down, the “B” measurement is the length of the bar from the roofline to the start of the bend at the shoulder/doorsill, as it angles down toward the floor. To determine the rest of the main hoop, in terms of outside dimensions, you’ll need to get lengths for both height and width.Fitment is critical to not only a professional appearance, but a car that offers ample room, so you want your bars to be snug to the body, without being so constrictive that you can’t weld the bar. Perry suggests around one inch of gap, perhaps a little more, depending on your desired fit and finish.
Measuring for the main hoop height. This is pretty self explanatory on a car with the stock floor, as that will be your base. On a chassis car, however, you first have to determine where exactly the bottom framerail (your floor, in essence) will be.To get your height, you’ll first need to measure from the roof down to the floor (the “C” dimension), or the main framerails, depending on whether this is a chassis car or one with the stock floor.

Measuring a car with the stock floor is relatively self explanatory; with a chassis car, you’ll generally want the framerail as low on the rocker panel as possible — this will be your “floor” as it pertains to measuring rollbar height. With a fully skinned body, you’ll measure lengthways across the body at the rocker panels to determine overall width of the rollbar/cage at its base. The fitment here is up to the builder, and in general, a chassis car will allow you to get a little tighter fit than a stock body/floor car.With that complete, you’ll then measure for the cross section of the main hoop, leaving the desired gap between the bar and the B-pillar. This will be your “B” measurement.
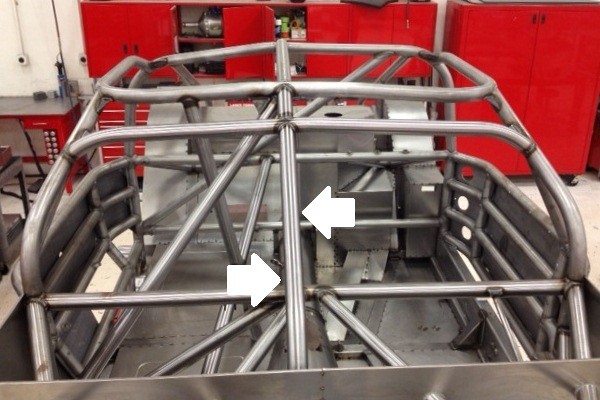
Again, whether a chassis car or not, you want a nice fit against the body here. However, if this is a stock body car, you’ll need to leave room in the base of the your main hoop in relation to the body so that you can still get a welder in there. You can put yourself into a pickle pretty easily here, if you get too greedy with the width of your main hoop.Lastly comes the “E” dimension, which is the cross section of the cage at the doorsill, or the base of the window. This will generally be wider than the “B” dimensions down at the floor, but not always.With those measurements in hand, all that remains is determining the angles of the bends in the hoop. Phantasy star online free download. For that, we turn back to the supplied cutouts that Chassis Engineering has supplied (or your own protractor). A halo bar being mocked up inside a skinned body at Chassis Engineering.When moving to a full rollcage, there are a few additional measurements that have to be taken.
Chassis Engineering, for shipping purposes, builds their rollcages with a halo bar, a U-shaped hoop, for the top of the cage, with a separate pair of bars on each side that drop down the through the dash to the floor. Some builders use a full length bar along the door, from the main hoop all the way through the dash to the floor, with a single bar across the top of the windshield.
Indiana Jones and the Last Crusade Trailer When Dr. Henry Jones Sr. Suddenly goes missing while pursuing the Holy Grail, eminent archaeologist Indiana must team up with Marcus Brody, Sallah and Elsa Schneider to follow in his father’s footsteps and stop the Nazis from recovering the power of eternal life. Indiana jones movies. Upon hearing from a private collector, Walter Donavan, that the mission for the Holy Grail went astray with the disappearance of his father, Indiana Jone On Putlocker - watch Indiana Jones and the Last Crusade 1989 in HD 1080p with high speed link.
Chassis Engineering’s design eliminates one measurement — arguably one of the tougher bars to get right — from the process.Like the main hoop, you need some basic dimensions for the halo bar. The first is the distance down the center from the main hoop to the windshield, along the roof (the “C” dimension of the cage). Then, you need a cross section; to do this, you simply measure the inside of the A-pillar, at the corner of the windshield, across to the same spot on the opposite side (this is the “A” dimension of the halo bar). This figure from Chassis Engineering’s interaction guide illustrates how to use a protractor to determine the angle of degrees of the bend, at the doorsill on your main hoop, and on the A-pillar bar at the dash/door jam.Before doing that, however, you need to decide the base point for the A-pillar bar, at the floor.
As we’ve mentioned, this will depend on whether this is a body-off chassis car or not. Regardless, you want to have the bar tucked neatly against the body, forward of the door, so it isn’t out in the open when the car door is open.You can again use your protractor to get the angle on the bend at the door jam/dash. To do this, you simply place the 45-degree angle quadrant at the center of the bend in the door jam, and follow the arch up as it projects toward the roof, and down toward the floor. Subtract the small number from the later number, and you’ll arrive at the angle of degrees of the bend at the dash/A-pillar.With these measurements complete, you should be set with your rollcage, whether you’re ordering from a builder like Chassis Engineering, or bending and cutting your own bar stock. As with anything in the construction of a one-off race car, any extra mock-up steps that you can take will ultimately benefit you in the long run, helping to ensure that all of your measurements and angle determinations correct and appropriate for the body.